Hello readers,
So, sorry I've been a bit out of touch lately, but those of you in the theatre will understand- I'm smack dab in the middle of tech week for my latest show. And it is ridiculously complicated. For those of you not in the theatre... just trust me. Madness. I've barely had time to brush my teeth and eat, let alone post a project...
Which leads me to my wedding advice for the day: DELEGATE. You will not have time to do everything. Accept it and move on. I will soon be sending the materials for these programs to my wonderful Mom and my sister/co-maid of honor, who both live in Chicago, where they will do the assembling. Thank you! Find a friend, a bridesmaid, a mom, someone to help you get done. Trust me- they will be willing!
And one last note to those of you about to read and craft this: don't be intimidated by the length of these instructions. I'm only trying to be as detailed as possible, but it's really not too hard. I figured out a lot of the guesswork for ya ;-) Message me if you have questions!
Now, without further ado:

You will need (makes 120 programs):
- 120 sheets of card stock or cover stock in the color of your choice (Mine is blue)
- 120 sheets of plain white paper
- 40 yards of 1/4" ribbon in the color of your choice (mine was brown, and 33 cents for 10 yards at Michaels)
- 1 1-oz can of flower confetti in the color of your choice (I'm using ivory), or other small decoration (seashells, leaves, charms, etc)
- Small glass beads (Optional)
- Glue Gun
- Printer

1) You will be using one sheet of paper, and one sheet of card stock, both printed on both sides. To begin, open a document in MSWord or similar, and format the page to have two columns. This will be the outside back and front of your program. The left column will be the back side. I chose to place a map to the ceremony site with directions on this side, but you can do anything you like. The right column will be the front of your program. It is traditional to write "The wedding celebration of" and then the names of the bride and groom and the date. As you will see below, I left space between our names and the date to make room for the decoration. How big a space you need depends on the size of your decorations. When printed, the first page looks like this:


I used "Edwardian ITC" font (MSWord) for the script throughout, and "Minion Pro" for the normal text.
2) Next, we'll print the insides of your program cover. This will be printed on the other side of the same sheet of card stock we used to make the front and back outside cover. Again, make a document with two columns. I chose to leave the left column blank (front inside cover). In the right column (back inside cover), I chose to write a note of thanks, and remember our grandparents who passed away. the text reads:
"We'd like to thank all of our family and friends who are here to day- and remember those that couldn't be.
In Memoriam: (names of people you want to remember)
We love you all, and it means so much to have you share in our happiness.
--- Adam & Alicia"
Print this sheet on the same sheet of cardstock as the outside cover, making sure that it feeds into your printer so that both are lined up with the top of the page. When you fold it, the names and date should be on the front, the thank you note inside on the right, and the map and directions on the back.

3) Now we'll do the same thing for the insides of the program on the sheet of paper. The program I'm making has two small pages inside the cover. If you'd like to have more, just figure out what needs to be printed where to get the order you want, and the binding technique is the same.
Format a document with two columns. Leave the left column blank. In the right column, put the title "Our Wedding party" and list the names of the wedding party (and their relations to the bride and groom, if you like), including parents and the officiant. The length of this column and the "ceremony" column we'll do next determine how long your program will be. If you'd like a smaller booklet, make the font smaller, and vice versa. Mine goes about 2/3 way down the page, making the booklet a dainty size :-)
Print the page on the regular sheet of paper.

4) Format a document with two columns and leave the left one blank. This time, type "Our Ceremony" in the right column, and list the order of events for your ceremony, including as much or as little detail as you'd like. Again, if you'd like more pages, just rinse and repeat the instructions I gave you, making sure they'll be in the right order when you put them together. Print this page on the opposite side of the regular paper.

5) Now for the fun part. First, stack the pages on top of each other, with the "Ceremony" and "thank you note" (inside cover of program) sides facing up. Draw a line with a ruler a little bit lower than the last line of text, then cut both pages together with scissors or a razor blade (fast pass: use a paper cutter at a copy shop, for the love of pete!). Fold them together, and it will look like...a program! Fancy that!

6) Next, cut two slits through both sheets of paper at the fold, about 3 inches apart.

7) Cut a 12-inch piece of ribbon, and thread it through the holes, securing the pages together, and finishing with both ends on the outside of the program. Tie the ends together in a knot. You can cut it here, or tie a knot again further down, making a little tail.

8) Last but not least: glue your decoration onto the front! I glued a small ivory flower, and then a bead in the center. Voila! A cute and customized program that didn't break the bank. Total cost for my 120 programs: 14.75.
Thanks for reading, and I will post more soon. Next project: chiffon flower bridal sash... it's so pretty!
Alicia
So, sorry I've been a bit out of touch lately, but those of you in the theatre will understand- I'm smack dab in the middle of tech week for my latest show. And it is ridiculously complicated. For those of you not in the theatre... just trust me. Madness. I've barely had time to brush my teeth and eat, let alone post a project...
Which leads me to my wedding advice for the day: DELEGATE. You will not have time to do everything. Accept it and move on. I will soon be sending the materials for these programs to my wonderful Mom and my sister/co-maid of honor, who both live in Chicago, where they will do the assembling. Thank you! Find a friend, a bridesmaid, a mom, someone to help you get done. Trust me- they will be willing!
And one last note to those of you about to read and craft this: don't be intimidated by the length of these instructions. I'm only trying to be as detailed as possible, but it's really not too hard. I figured out a lot of the guesswork for ya ;-) Message me if you have questions!
Now, without further ado:

You will need (makes 120 programs):
- 120 sheets of card stock or cover stock in the color of your choice (Mine is blue)
- 120 sheets of plain white paper
- 40 yards of 1/4" ribbon in the color of your choice (mine was brown, and 33 cents for 10 yards at Michaels)
- 1 1-oz can of flower confetti in the color of your choice (I'm using ivory), or other small decoration (seashells, leaves, charms, etc)
- Small glass beads (Optional)
- Glue Gun
- Printer

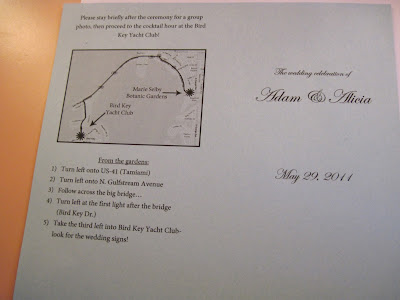
1) You will be using one sheet of paper, and one sheet of card stock, both printed on both sides. To begin, open a document in MSWord or similar, and format the page to have two columns. This will be the outside back and front of your program. The left column will be the back side. I chose to place a map to the ceremony site with directions on this side, but you can do anything you like. The right column will be the front of your program. It is traditional to write "The wedding celebration of" and then the names of the bride and groom and the date. As you will see below, I left space between our names and the date to make room for the decoration. How big a space you need depends on the size of your decorations. When printed, the first page looks like this:

Close-up of left column (back):

Close-up of right column (front):

2) Next, we'll print the insides of your program cover. This will be printed on the other side of the same sheet of card stock we used to make the front and back outside cover. Again, make a document with two columns. I chose to leave the left column blank (front inside cover). In the right column (back inside cover), I chose to write a note of thanks, and remember our grandparents who passed away. the text reads:
"We'd like to thank all of our family and friends who are here to day- and remember those that couldn't be.
In Memoriam: (names of people you want to remember)
We love you all, and it means so much to have you share in our happiness.
--- Adam & Alicia"
Print this sheet on the same sheet of cardstock as the outside cover, making sure that it feeds into your printer so that both are lined up with the top of the page. When you fold it, the names and date should be on the front, the thank you note inside on the right, and the map and directions on the back.

3) Now we'll do the same thing for the insides of the program on the sheet of paper. The program I'm making has two small pages inside the cover. If you'd like to have more, just figure out what needs to be printed where to get the order you want, and the binding technique is the same.
Format a document with two columns. Leave the left column blank. In the right column, put the title "Our Wedding party" and list the names of the wedding party (and their relations to the bride and groom, if you like), including parents and the officiant. The length of this column and the "ceremony" column we'll do next determine how long your program will be. If you'd like a smaller booklet, make the font smaller, and vice versa. Mine goes about 2/3 way down the page, making the booklet a dainty size :-)
Print the page on the regular sheet of paper.

4) Format a document with two columns and leave the left one blank. This time, type "Our Ceremony" in the right column, and list the order of events for your ceremony, including as much or as little detail as you'd like. Again, if you'd like more pages, just rinse and repeat the instructions I gave you, making sure they'll be in the right order when you put them together. Print this page on the opposite side of the regular paper.

5) Now for the fun part. First, stack the pages on top of each other, with the "Ceremony" and "thank you note" (inside cover of program) sides facing up. Draw a line with a ruler a little bit lower than the last line of text, then cut both pages together with scissors or a razor blade (fast pass: use a paper cutter at a copy shop, for the love of pete!). Fold them together, and it will look like...a program! Fancy that!

6) Next, cut two slits through both sheets of paper at the fold, about 3 inches apart.

7) Cut a 12-inch piece of ribbon, and thread it through the holes, securing the pages together, and finishing with both ends on the outside of the program. Tie the ends together in a knot. You can cut it here, or tie a knot again further down, making a little tail.

8) Last but not least: glue your decoration onto the front! I glued a small ivory flower, and then a bead in the center. Voila! A cute and customized program that didn't break the bank. Total cost for my 120 programs: 14.75.
Thanks for reading, and I will post more soon. Next project: chiffon flower bridal sash... it's so pretty!
Alicia
Hooray! These will come in handy when Mom and I are assembling. Great project to do while kiddos are napping, and so much easier to cart around than those floating pomanders from your shower!
ReplyDelete