Sunday, March 27, 2011

Easy Peasy Beautiful Veil

Hello there Readers! Get ready for another great guest blog from our favorite DIY Mom of the Bride, Kate! (applause ;-] )

Kate:

Alicia wanted a simple tulle veil to fall just to the small of her back (the better to show off the awesome cascade of chiffon ruffles on the back of the dress).

Even the most simple of veils run about $100, and can go up to over $400... So we decided to make it.

I did decide to use a pattern, which I purchased during a $1 pattern sale!

The only real challenge is finding tulle 108 inches wide. The traditional fabric stores only carry 48 inch wide, and you do not want any seams in your veil. You can find it online at several websites, just Google "108 inch wide tulle." There are 3 traditional shades of white to choose from: bright white, diamond white, and cream. Diamond white was closest to Alicia's dress color, so that's what I bought.

You will need:

- A bridal veil pattern (You can find the one I used online for $7.99 on Amazon.com of you don't have access to a proper fabric store)
- Tulle (see note above)... this project needed two yards.
- Plastic or wire hair comb
- 6 inches of decorative ribbon of your choice to cover the comb
- Fishing line
-Needle or sewing machine and thread
-Hot glue gun (our favorite tool...)

Cutting out the tulle requires a fairly large table, and two people are helpful in making sure that much fabric is laid out evenly. I used lots of pins to be sure it all stayed in place while cutting.
All you need to do is gather the tulle according to the length of either the comb or headband you are using

I find zigzagging a length of fishing line over the marked line the easiest way to gather large pieces of fabric. It pulls easily.

 I bought a set of two combs at the craft store for $6. I'm sure you could find a plain plastic one for less, but at that point, I just wanted to get going, not search. I also bought a piece of pretty ribbon to hot glue on to dress it up.


Stich the veil onlto the comb, and then hot glue the ribbon on, wrapping the ribbon around the edges to the back of the comb so there is no exposed edge.

That's it, you're done.


If you want a fancier veil, you can buy sparkly tulle, tulle with rhinestones on it, or add lace around the edge.

Cost of this project:
2 yards of tulle: $4, ribbon 25 cents, and combs (could find for less) $6, pattern $1

Total: $11.25

This is Mom of the Bride, heading off to get those bridesmaid dresses done!

Ring Pillow: from Mom's wedding dress!

Hello, crafty readers! So, since I'm on vacation in Texas in the moment and didn't want to leave you in the cyber-wasteland of no posts for 5 days, it's very fortunate that we have a guest blogger this week! I would like to introduce you to the first post from the "Mom of the Bride," (my super-crafty mommy!): Kate McClelland!

She taught me lots of what I know, and I know you'll all be impressed with the things she's doing for my wedding :-) Without further ado... here is Kate!

Kate:


Alicia and Adam are using a ring pillow in their ceremony to pass the wedding bands around during the ceremony for their guests to bless them prior to their exchanging them.

Since none of my three daughters wanted to use my wedding dress (and who could blame them!), we had decided that using it for ‘parts’ was a nice way to have something special (and OLD) in their weddings. For Alicia, the ring pillow is the winner of her parts! 

(*Note from Alicia: If you don't have a mom who is as super gracious as mine and is willing to cut up her wedding dress, you could do something similar with a special handkerchief, a communion dress, an old lace veil, or just some pretty fabric you bought from the store*)


You will need:


- 2 9 1/2" squares of fabric for the pillow (or several squares of different fabrics to layer, as I've done below
- Polyester quilting batting or poly-fill pillow stuffing
- Ribbon of your choice
- Two buttons
- Lace or lace overlay from a wedding dress (or handkerchief, etc.)

A ring pillow is traditionally about 8 inches square. I could not find a pillow form of this size, except in already made ring pillows for between $20 and $40 at the craft store in the wedding section.

But….being at least as crafty as my daughter, I had left over batting sitting in a drawer, so cut up several 8 inch squares of that to make a form. You want it thick enough to be pillow like.

 (*You can also buy batting at the fabric store for a small amount of money if you don't have any lying around, or stuff the pillow case with loose cotton filling*)


My dress had an overlay of chiffon, so I cut the satin and chiffon separately into 9 ½ squares (to allow for seam allowance), and then sewed the chiffon to the satin so it would not slip while making  it into the pillow.

Then sew the now two pieces together (right, or chiffon, sides facing each other), leaving most of one side open to insert the pillow form. Turn the pillowcase inside out, so now the chiffon pieces are facing out, and the seams are hidden on the inside. 


Insert the pillow form and slip stitch the open sides together.

Next I took two buttons and put one on each side of the pillow and sewed through the pillow connecting them, pulling tightly to create that ‘pillow-like’ indentation, and also a place to attach the ribbons to hold the rings.


Now I was ready to hand stitch lace from the wedding dress onto the top of the pillow.


I cut 4 pieces of ribbon to about 36 inches long (so there was some nice length to fall off the pillow after the rings were tied on). Cut the ribbon at an angle, and dab the ends with clear nail polish to prevent the edges from fraying.


 Once the polish is dry, you are ready to tie the ribbons around the button.


There you go! Easy as can be.

Total cost for the ring pillow:  60 cents in ribbon.

Sentimental value: priceless


*Thanks, Mom!*

Friday, March 18, 2011

Cute and Customized Table Chart

So, I lied. You'll get the chiffon flower sash next time. But it's worth the wait! And I will include a chiffon flower hair comb as well :-) In the meantime, you'll have to satisfy your crafting appetites with this simple (and extremely useful) table chart. If you're having a large wedding, it's especially important to have a table chart so people can find where they're sitting without traipsing the whole room. While assigning table numbers is traditional, many couples these days (including us) are choosing to assign table names instead (more on this later). If this is the case, this chart is particularly useful. And have I mentioned the best part? This whole project only cost $6.35. How great is that? Read on...


You will need:
- 2 20x30" white foam boards ($1.50 each on sale!)
- Small bottle of craft paint in the color of your choice (for the frame- I used brown)
- Foam paint brush
- Several sheets of card stock in the color of your choice (I used the same blue that I used for my programs)
- Alphabet letter stickers 1" to 1 1/2" high (I used these "Thickers" that I found at Michaels- $4.99, but only $2.50 with a coupon!)
- Glue gun
- Razor blade or Xacto knife
- Printer

1) Mark out a border on the first foam board  that is 2" from the edge in all directions (basically, it's a rectangle 2" smaller on each side than the board itself), and cut it out carefully with a razor blade or Xacto knife- make sure you protect the surface underneath! This will be your frame.


2) Discard the middle rectangle and just keep the "frame." Paint the frame completely (including the side edges) using your craft brush and paint. Once it has dried, secure it on top of the second foam board using hot glue, framing the blank board. Just so you get a comparison idea, a picture framing mat (which I was thinking of using) for this size of board would cast $5.99, plus an additional $9 for cutting, or a total of $28 for a custom cut mat from the framing counter at Michaels. With this, you get a great looking frame in your custom color for only $1.50! Gotta love that.


3) Next, take your stickers (or "Thickers" in my case) and place them along the top of your frame. Make sure you count the number of letters and spaces in your phrase and center the phrase over the middle. For example, I chose the phrase: "where's your table?" which has 19 characters including punctuation and spaces as characters. Therefore, the middle character is #10 (the "u" in "your"), and that's the one that should be placed in the center of the frame. Put it down first, and then space the rest of your phrase before and after it.


 4) The next step is to make the shapes representing your tables. I used Microsoft Word, and simply added shapes (circles and rectangles) in different sizes. To do this, click "Insert" and then "shape," then draw whatever shape you need for the tables you have. I have several different table shapes and sizes, so I did a combination of two different sizes of circles, and several rectangles. Make sure you print out a sample sheet so you can check the size of the tables on your board. Obviously, the bigger they are, the easier they are to see, so make them as large as you can fit. After I made my shapes, I inserted a text box over each shape, and typed the table name. Next, print them on the card stock and cut them out!


Note: Some couples choose table names based on a theme of their wedding- different types of flowers for a garden wedding, tropical fish for a beach wedding, or famous movie couples for a vintage Hollywood theme. This can obviously be incorporated into the table decorations as well. Adam and I had a lot of people coming from out of town, who haven't spent a lot (or any) time with us as a couple, so we decided to name our tables after cities and places that were important to us and our lives, most of which we had traveled to together. In a project you will see later, we will make table card tents. On one side will be a picture of one or both of us in that place with the name of the place on top. On the other side of the card we will have a short explanation of the significance of the place to us and our relationship. That way, everyone learns a little more about us (and no one has to feel they are insignificant if they are placed at "Table 15")!

5) Last step: Place the table cutouts on the board in the order you want, and tape them down. I recommend using painter's tape, so you can move them around if you change your mind!


So there you have it. An extremely affordable and cute wedding accessory that you can do in very little time- my favorite kind of project :-) Thanks for reading, and I will post those chiffon flowers soon!

Alicia


Wednesday, March 16, 2011

Garden Wedding Programs

Hello readers,

So, sorry I've been a bit out of touch lately, but those of you in the theatre will understand- I'm smack dab in the middle of tech week for my latest show. And it is ridiculously complicated. For those of you not in the theatre... just trust me. Madness. I've barely had time to brush my teeth and eat, let alone post a project...

Which leads me to my wedding advice for the day: DELEGATE. You will not have time to do everything. Accept it and move on. I will soon be sending the materials for these programs to my wonderful Mom and my sister/co-maid of honor, who both live in Chicago, where they will do the assembling. Thank you! Find a friend, a bridesmaid, a mom, someone to help you get done. Trust me- they will be willing!

And one last note to those of you about to read and craft this: don't be intimidated by the length of these instructions. I'm only trying to be as detailed as possible, but it's really not too hard. I figured out a lot of the guesswork for ya ;-) Message me if you have questions!

Now, without further ado:

You will need (makes 120 programs):
- 120 sheets of card stock or cover stock in the color of your choice (Mine is blue)
- 120 sheets of plain white paper
- 40 yards of 1/4" ribbon in the color of your choice (mine was brown, and 33 cents for 10 yards at Michaels)
- 1 1-oz can of flower confetti in the color of your choice (I'm using ivory), or other small decoration (seashells, leaves, charms, etc)
- Small glass beads (Optional)
- Glue Gun
- Printer

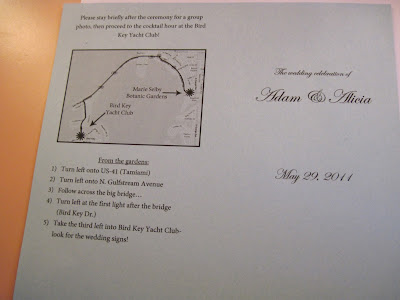
1) You will be using one sheet of paper, and one sheet of card stock, both printed on both sides. To begin, open a document in MSWord or similar, and format the page to have two columns. This will be the outside back and front of your program. The left column will be the back side. I chose to place a map to the ceremony site with directions on this side, but you can do anything you like. The right column will be the front of your program. It is traditional to write "The wedding celebration of" and then the names of the bride and groom and the date. As you will see below, I left space between our names and the date to make room for the decoration. How big a space you need depends on the size of your decorations. When printed, the first page looks like this:

Close-up of left column (back):

 Close-up of right column (front):

I used "Edwardian ITC" font (MSWord) for the script throughout, and "Minion Pro" for the normal text.

2) Next, we'll print the insides of your program cover. This will be printed on the other side of the same sheet of card stock we used to make the front and back outside cover. Again, make a document with two columns. I chose to leave the left column blank (front inside cover). In the right column (back inside cover), I chose to write a note of thanks, and remember our grandparents who passed away. the text reads:

"We'd like to thank all of our family and friends who are here to day- and remember those that couldn't be.
In Memoriam: (names of people you want to remember)
We love you all, and it means so much to have you share in our happiness.
--- Adam & Alicia"

Print this sheet on the same sheet of cardstock as the outside cover, making sure that it feeds into your printer so that both are lined up with the top of the page. When you fold it, the names and date should be on the front, the thank you note inside on the right, and the map and directions on the back.


3) Now we'll do the same thing for the insides of the program on the sheet of paper. The program I'm making has two small pages inside the cover. If you'd like to have more, just figure out what needs to be printed where to get the order you want, and the binding technique is the same.

Format a document with two columns. Leave the left column blank. In the right column, put the title "Our Wedding party" and list the names of the wedding party (and their relations to the bride and groom, if you like), including parents and the officiant. The length of this column and the "ceremony" column we'll do next determine how long your program will be. If you'd like a smaller booklet, make the font smaller, and vice versa. Mine goes about 2/3 way down the page, making the booklet a dainty size :-)

Print the page on the regular sheet of paper.


4) Format a document with two columns and leave the left one blank. This time, type "Our Ceremony" in the right column, and list the order of events for your ceremony, including as much or as little detail as you'd like. Again, if you'd like more pages, just rinse and repeat the instructions I gave you, making sure they'll be in the right order when you put them together. Print this page on the opposite side of the regular paper.


5) Now for the fun part. First, stack the pages on top of each other, with the "Ceremony" and "thank you note" (inside cover of program) sides facing up. Draw a line with a ruler a little bit lower than the last line of text, then cut both pages together with scissors or a razor blade (fast pass: use a paper cutter at a copy shop, for the love of pete!). Fold them together, and it will look like...a program! Fancy that!


6) Next, cut two slits through both sheets of paper at the fold, about 3 inches apart.


7) Cut a 12-inch piece of ribbon, and thread it through the holes, securing the pages together, and finishing with both ends on the outside of the program. Tie the ends together in a knot. You can cut it here, or tie a knot again further down, making a little tail.


8) Last but not least: glue your decoration onto the front! I glued a small ivory flower, and then a bead in the center. Voila! A cute and customized program that didn't break the bank. Total cost for my 120 programs: 14.75.


Thanks for reading, and I will post more soon. Next project: chiffon flower bridal sash... it's so pretty!

Alicia

Sunday, March 13, 2011

Garden Escort Cards


Hello there, Readers!

So today's project is quick, easy, and quite inexpensive. You can obviously also use this design for place cards instead of escort cards, just changing a few details. I'm going to show you how to make these escort cards with my little blue flowers, but you can easily make these cards with whatever small decoration you'd like- a seashell for a beach wedding, a pretty leaf or leaf stamp for a fall wedding, etc. Be creative and the personal touch will make a big difference :-)

You will need (Makes 96 cards):
- 2 packages of 48-count printable place cards (I got these platinum border cards by Gartner studios at Michael's for $4.99 per package)
- 1 oz. container blue flower table confetti, or other decoration (Mine was $4.99 at Michaels- the same confetti I bought also comes in green, pink, purple, yellow, silver, and ivory)
- 1 small package clear/silver glass beads
- Glue Gun
- Printer

1) Place your decoration on the unprinted cards, and measure how much space it takes up on the card. Mine needs 1 1/2" from the left edge.


2) Format the text for your cards on your computer. The place cards you buy these days come with a template that you can usually download online. My "Gartner Studios" cards came with a template I got off their website. Next, you need to adjust the margins on each column to make room for your decorations. For mine, I moved the left margin of each column 1 1/2" to the right. Then, you can type in the names and table information- remember, the fanciness of the font determines the formality of the event. Make sure you print a test page and lay it on top of the cards, to ensure everything is lined up properly. Then print away! The best thing about the printer cards is you can keep changing the tables, names, etc. til about a week before, since they take so little time to put together.

3) After you've printed your cards, pop them out of the perforation, and use your glue gun to glue a flower on each one. Then, glue a silver bead in the center of each flower. Voila! You're done! And I bet they look great :-)


See you next time!

Alicia

Friday, March 11, 2011

Today's Project: Wedding Signs!


So, not signs that there will be a wedding. Actual stake signs that go in the ground   :-) It's much easier than you think, and it costs very little- just takes some time and patience! Inspiration always helps... I based ours off the design for our invitations (below- find them here)


You will need: (Makes 4 2'x1'signs)
- Craft paint in colors of your choice
- Some foam paintbrushes, plus a smaller brush for detailing
- 4 36" wooden stakes (you can get these at a hardware store for 59 cents apiece)
- 8 1 1/2 " deck screws (I used nails, but screws work better- my uncle Tim the Toolman pointed that out!)
- A screwdriver (or hammer, if you're using nails)
- Masking tape
- Optional: Stencils and/or stick on letters
- 1 8' 12"x1" pine board, cut into 4 2-ft sections
(Hint: If you go to the hardware store to get this, they will cut your wood for free! No kidding! At the Home Depot I went to, they made the first two cuts for free, and the third cut was supposed to cost a dollar. The cashier ended up not charging me for it, but even if they had, it would only cost $1... no tool shed necessary. It's so easy!)


1) Paint the boards and stakes in the color of your choosing. Make sure to protect your ring, future brides! And the floor, of course. Regular craft paint works fine for this- I happened to have some paint left over from my living room painting that was nearly the right color. I mixed it with some white I already had and Voila! Perfect color and it didn't cost me a cent. Look for stuff to reuse around the house and save moolah.

2) Using 2 screws, screw the stake to the back of your board, with the end of the stake close to the top. (Tim the Toolman uncle points out that it will be sturdiest if the stake is flush with the top edge... that way, when you're pounding them into the ground, the front part will be less likely to get wrenched off!) Speaking of pounding, if you're using two nails and a hammer instead, try and do this during the daylight hours and avoid irate neighbors.

3) Here's where the fun part starts. This can be as easy or as complicated as you want it to be. If your event is rustic, just freehand your lettering and an arrow, and you're done! If you want to get fancy and add scripted lettering, you can either buy some stick-on letters and use those, get a stencil from a craft store, or use my money-saving trick. Find a font you like in a regular word processing program like Word, type out your text in LARGE font (it should take up the whole page), and print it out. Then, center it on your sign, and outline the letters with a Sharpie, pressing down hard. When you take the paper away, you should have an outline of your scripted letters, which you can then fill in with a paint pen, marker, or craft paint. A little more work, but it costs nothing and you can pick the size and font you want.

4)  I decided I wanted to add some of the flower design that was on my invitations (see photo at the top of the post). Since I'm rather arty, I practiced on a piece of paper, and then drew my design on the board with a pencil. If you're not so confident, you can either use a stencil or use the same Sharpie trick we did with the letters, with a printed image (simple ones work best). For the arrow, you can freehand it, use a stencil, or simply mark one out with masking tape like I did. After you've filled it in, take off the tape and you've got a perfect arrow. 

5) The finished product? A customized, economical sign that is both practical, and adds a personal touch to your day. Total cost of my 4 signs: $21.89. Hooray for DIY!

Thanks for reading, and check back for more projects soon :-)

Alicia

Thursday, March 10, 2011

Welcome!

Hello there, you intrepid readers! I'd like to welcome you to my humble blog, and thank you for visiting. My name is Alicia Dawn, and I am a 24 year old bride to be. I've been engaged since Feb. 14 2010, and the big day is fast approaching! I'll tie the knot to my wonderful fiancĂ© Adam on May 29, 2011. We're both actors in our last year of graduate school and though our parents are graciously footing the bill for this celebration, we are still working with a strict budget and needed to come up with creative solutions for a big statement with a small price tag.

Trouble was, the more I researched wedding products, decorations, stationery, and everything in between, the more I realized that HOLY MAJOLEY some of this stuff is WAY overpriced. And by some I mean most. And by overpriced we're talking up to a 75-150% markup from material cost. (That's right, bridal stores. I 'm talking to you. You know how much tulle costs? 99 cents a yard. Plastic combs? 50 cents apiece. How is it that when you put them together it now costs $150? Ridiculous). And it doesn't stop there. Now don't get me wrong, I understand these people are running a business and they are charging for labor, cost of operations, etc. But the more I started thinking and working, the more I realized that with a little know how and some elbow grease, I could make a LOT of these things myself. Enter... the DIY extravaganza.

As I started on these projects and became very pleased with the results, (which spawned more ideas, which led to more projects), it occurred to me that there were many brides (and other people planning parties- not excluding you folks!) out there who were perfectly capable of making these things and saving a serious wad of cash, but maybe just didn't know how. Or lacked my copious amount of free time in between rehearsals to think up such devious corporate wedding machine-dodging projects.

So here we have it. A blog. I will be updating periodically with step-by-step instructions (with photos) of the projects for my wedding, and also with some posts about specific aspects of planning a wedding (us plannerless brides can do it, by gads). I'm sure some real-life posts will sneak in too, and you'll get a window into the personal effects of wedding planning too :-)

That's all for now, check back soon, and until next time... power to the crafters!

Alicia